
Once again, there are new updates on the Timeguru platform. The new update was released in September 2024. This time, we have focused on updates that make our user interface even more user-friendly and clear, making it easier to register – even when accessed from a mobile device.
Time Registration in the Weekly Schedule
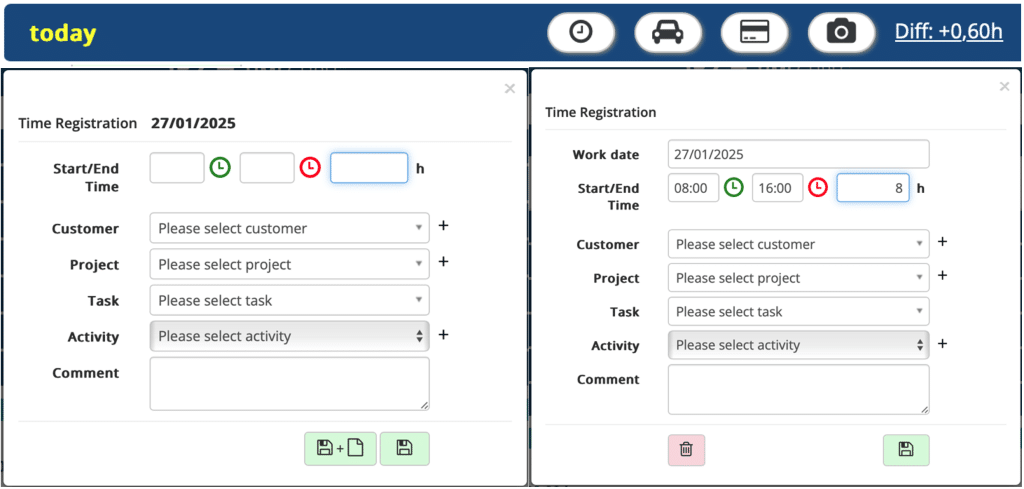
We have updated the clock layout for time registration in the weekly schedule. We have thoroughly tested various clock formats and ultimately prioritized speed and ease of use. The update includes that when you access your weekly schedule and want to register time:
- The clock is displayed digitally with hour and minute digits.
- You can click on the numbers, and a box for hours and minutes will appear. Then you can click on the number you want to register.
- You can also click up and down on the arrows to reach the desired time.

Icons
Several registration options are now displayed as icons, mainly in the weekly schedule. Where descriptions of the actions required were previously provided, icons now appear in the standard setup.
The icons added are:
- Time: A clock.
- Save: A floppy disk (as we know it from word processing programs).
- Delete: A trash can.
- Mileage Registration: A car.
- Photo Documentation: A camera.
- Expense: A payment card.
- Save + New: A floppy disk + a document.
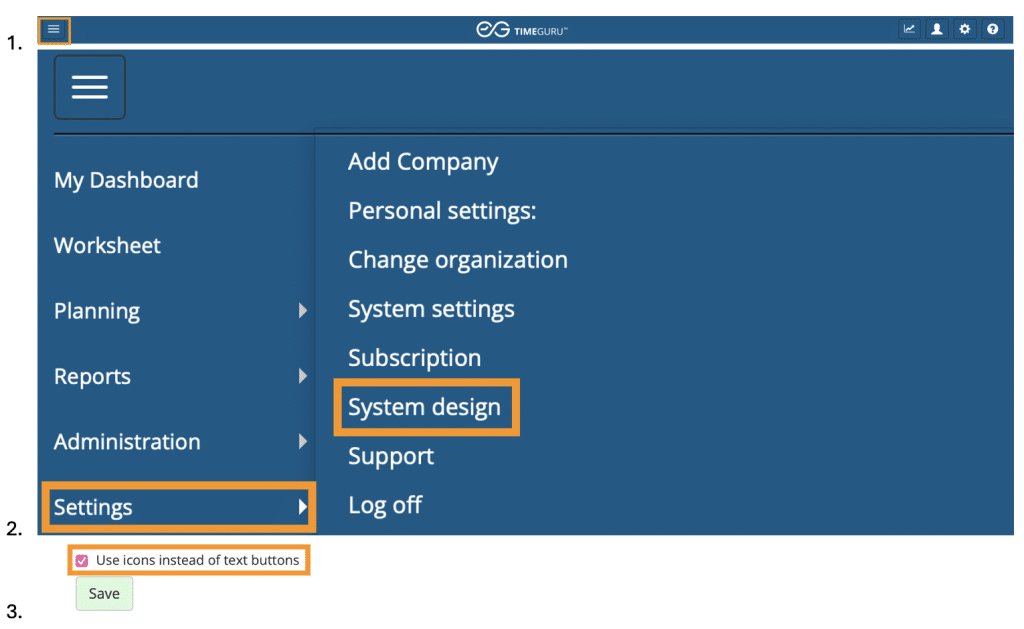
If you prefer the previous system layout where actions are described, you can easily disable the icons by going to the menu Settings > System Design. Here, you can simply uncheck the box “Use icons instead of text for buttons” and click “Save.”
Hide Previous Days in Weekly Schedule
Now you can hide previous days in the current week in your weekly schedule. This means that already on Tuesday, a link will appear above the weekdays that says “Hide previous days.” If you click on the little orange “i,” you can read a detailed description of the function. If you have chosen to hide previous days, the link will instead read “Show the whole week.”

Mobile Version:
Hiding and showing weekdays is done by clicking the little plus or minus in the box at the top left.
Flex Time
- Flex time is also displayed as hours and minutes, and is shown under the flex time displayed in decimal numbers.
- It is now possible to export the flex time report to Excel.
Check In/Out Terminal
- It is possible to set a default activity for a user, which is automatically selected if activities are hidden when logging in at the shared terminal. This is useful if you have several employee groups with different pay supplements using the same check in/out terminal.
Payroll Export
- It is possible to cancel an already processed payroll export. This is done by retrieving a previous export and clicking on the button that appears with the text “Cancel export.” Upon cancellation, the registrations are released so they can be exported again.
New Feature for Employees with User Dashboard Access
- Employees with the user dashboard access to TimeGuru now have access to the time report, so they can view their own registrations history. This has been added to support the new EU law on time registration.
Export of User Information
- Ability to export all user information to Excel, making it easy to see if all employees are correctly set up. The extract also contains the current standard time setup.
Time Registration in Periods
- The administrator tool for “Time Registration in Periods” has been updated so you can register part of the day, possibly in fixed periods, e.g., part-time sick employees. Previously, you could only register the entire day based on the employee’s daily norm.
Employee Status
- We have updated our widget that provided an overview of absent employees. Now it can give an employee status for all employees.
- This will make it easier to see, for example, who is working from home or out with a customer. Or you can use the employee status to also see who has clocked in at the clock in/out terminal.
- You can add an activity to the employee status widget by going to activities and clicking “edit” on the selected activity. In the section under optional settings, check the box “Show in vacation plan and employee status widget.”
